간단한 뉴스 앱 만들기 #1 - UI 생성
지금까지 한 내용을 바탕으로 newsapi.org에서 뉴스 데이터를 받아와 내용과 이미지 제목 등을 표현해주는 어플을 만들어보자.
UI 목표를 세우자.

위 이미지 처럼 뉴스를 대표하는 이미지와 제목, 내용을 받아와서 화면에 뿌려주자.
먼저 두가지를 이용할 것이다.
    implementation 'com.android.support:recyclerview-v7:28.0.0'
    implementation "androidx.cardview:cardview:1.0.0"
recyclerview와 cardview를 이용할 것인데, 목표 이미지와 같이 그저 요소들을 나열할 뿐이면 ListView로 해도 상관없지 않을까?
recyclerview
이거에 대한 내용은 recyclerview의 역할에 대해 이해하면 쉽다.
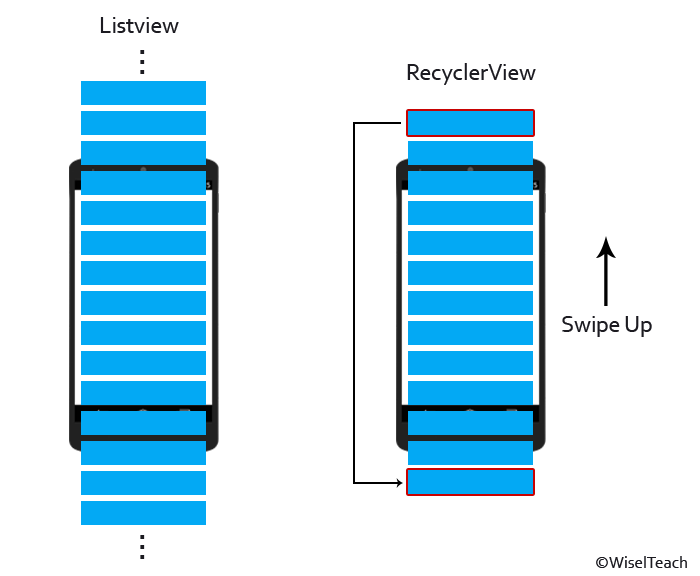
만일 가져올 데이터가 100개이고, 화면에 볼 수 있는 데이터들은 옆 이미지처럼 3개라하자.
가장 아래의 데이터를 보려고 하면, 데이터를 표현할 블럭이 총 100개를 생성하고 삭제해야 한다.
비록 볼 수 있는 블럭이 3개라 하더라도...
여기서 recyclerview가 빛을 발한다.
똑같은 상황에서 이 recyclerview는 10개의 데이터를 미리 불러와 블럭을 생성하고 ui에 띄운다.
그리고 새로운 데이터를 불러올 때 위에서 사라질 블럭을 삭제하지 않고 그 블럭에 데이터를 입력하여 아래에 띄운다.
100개의 블럭을 생성하고 삭제하는 처리와 단지 데이터를 덧씌우는 처리를 비교하면 당연히 덧씌우는 처리가 더 효율적이라 할 수 있다.
이 내용에 대한 이미지이다.

출저: https://wooooooak.github.io/android/2019/03/28/recycler_view/
이 recyclerview를 메인 layout에 뿌려두자.
<?xml version="1.0" encoding="utf-8"?>
<LinearLayout xmlns:android="http://schemas.android.com/apk/res/android"
    android:layout_width="match_parent"
    android:layout_height="match_parent"
    android:orientation="vertical"
    >

    <androidx.recyclerview.widget.RecyclerView
        android:id="@+id/my_recycler_view"
        android:scrollbars="vertical"
        android:layout_width="match_parent"
        android:layout_height="match_parent">


    </androidx.recyclerview.widget.RecyclerView>

</LinearLayout>
이제 이 화면 위에 cardview 요소들을 삽입하여 보여줄 것이다.
cardview
cardview는 목표 이미지 처럼 요소 하나하나에 음영과 각을 일반 View보다 더 쉽게 적용할 수 있는 View이다. 즉, 더 이쁜 ui를 만들 수 있다.
이왕 만드는거 더 이쁜게 좋지 않은가
cardview 요소 하나에 이미지, 제목, 내용을 채워보자.
위 main layout을 잠시 남겨두고 이 cardeview의 레이아웃을 새로 만든다.
이 레이아웃은 위 recyclerview에 들어갈 각각의 요소들이다.
<?xml version="1.0" encoding="utf-8"?>
<LinearLayout xmlns:android="http://schemas.android.com/apk/res/android"
    android:layout_width="match_parent"
    android:layout_height="200dp"
    xmlns:fresco="http://schemas.android.com/tools"
    android:orientation="vertical">
    <androidx.cardview.widget.CardView
        xmlns:card_view="http://schemas.android.com/apk/res-auto"
        android:id="@+id/card_view"
        android:layout_gravity="center"
        android:layout_width="match_parent"
        android:layout_height="match_parent"
        card_view:cardCornerRadius="4dp"
        android:layout_margin="12dp"
        >

    </androidx.cardview.widget.CardView>
</LinearLayout>
각 요소가 전체 화면을 담을 필요가 없으므로 layout을 적당한 크기로 지정한다.
그 후 레이아웃 내 cardview를 생성해서 넣어준다.
card_view:cardCornerRadius는 각의 둥근 정도를 지정해준다.
이 내부에 사진 제목 내용이 들어가야한다. 따라서, 이 내부에 LinearLayout을 생성해주고 요소를 정리한다.
위 목표에선 사진 위에 제목이 올려져 있다.
따라서, 이미지와 TextView를 하나로 묶고 조정할 필요가 있다.
LinearLayout보다 RelativeLayout이 어울릴 것 같다.
<?xml version="1.0" encoding="utf-8"?>
<LinearLayout xmlns:android="http://schemas.android.com/apk/res/android"
    android:layout_width="match_parent"
    android:layout_height="200dp"
    xmlns:fresco="http://schemas.android.com/tools"
    android:orientation="vertical">
    <androidx.cardview.widget.CardView
        xmlns:card_view="http://schemas.android.com/apk/res-auto"
        android:id="@+id/card_view"
        android:layout_gravity="center"
        android:layout_width="match_parent"
        android:layout_height="match_parent"
        card_view:cardCornerRadius="4dp"
        android:layout_margin="12dp"
        >
        <LinearLayout
            android:layout_width="match_parent"
            android:layout_height="match_parent"
            android:orientation="vertical"
            >
            <RelativeLayout
                android:layout_width="match_parent"
                android:layout_height="120dp"
                >
                <ImageView
                    android:id="@+id/ImageView_Title"
                    android:layout_width="match_parent"
                    android:layout_height="130dp"
                    />

                <TextView
                    android:id="@+id/TextView_Title"
                    android:layout_width="match_parent"
                    android:layout_height="30dp"
                    android:text="text"
                    android:textSize="18dp"
                    android:padding="6dp"
                    android:layout_alignParentBottom="true"
                    android:gravity="center"
                    android:background="#80000000"
                    android:textColor="#ffffff"
                    android:textStyle="bold"
                    android:ellipsize="end"
                    />

            </RelativeLayout>
            <TextView
                android:id="@+id/TextView_Content"
                android:layout_width="match_parent"
                android:layout_height="match_parent"
                android:text="text"
                android:textSize="20dp"
                android:gravity="center|left"
                android:maxLines="2"
                android:paddingLeft="6dp"
                android:paddingRight="6dp"
                android:ellipsize="end"
                />
        </LinearLayout>

    </androidx.cardview.widget.CardView>
</LinearLayout>
ellipsize는 글자가 너무 많을때 ...으로 표시
background #(10)10(FFFFFF)16 앞 두자리는 음영도를 표현한다.
maxLines는 표현될 수 있는 최대 n줄을 의미한다.
fresco
프레스코는 페이스북이 만든 안드로이드 이미지 라이브러리이다.
이를 이용하면, 별도의 이미지 처리 없이 이미지를 로드해주는 편리한 친구이다.
링크: fresco
이미지 뷰를 fresco를 이용해서 만들자.
implementation 'com.facebook.fresco:fresco:1.11.0'<?xml version="1.0" encoding="utf-8"?>
<LinearLayout xmlns:android="http://schemas.android.com/apk/res/android"
android:layout_width="match_parent"
android:layout_height="200dp"
xmlns:fresco="http://schemas.android.com/tools"
android:orientation="vertical">
<androidx.cardview.widget.CardView
xmlns:card_view="http://schemas.android.com/apk/res-auto"
android:id="@+id/card_view"
android:layout_gravity="center"
android:layout_width="match_parent"
android:layout_height="match_parent"
card_view:cardCornerRadius="4dp"
android:layout_margin="12dp"
>
<LinearLayout
android:layout_width="match_parent"
android:layout_height="match_parent"
android:orientation="vertical"
>
<RelativeLayout
android:layout_width="match_parent"
android:layout_height="120dp"
>
<com.facebook.drawee.view.SimpleDraweeView
android:id="@+id/ImageView_Title"
android:layout_width="match_parent"
android:layout_height="130dp"
/>
<!--fresco:placeholderImage="@drawable/my_drawable"-->
<TextView
android:id="@+id/TextView_Title"
android:layout_width="match_parent"
android:layout_height="30dp"
android:text="text"
android:textSize="18dp"
android:padding="6dp"
android:layout_alignParentBottom="true"
android:gravity="center"
android:background="#80000000"
android:textColor="#ffffff"
android:textStyle="bold"
android:ellipsize="end"
/>
</RelativeLayout>
<TextView
android:id="@+id/TextView_Content"
android:layout_width="match_parent"
android:layout_height="match_parent"
android:text="text"
android:textSize="20dp"
android:gravity="center|left"
android:maxLines="2"
android:paddingLeft="6dp"
android:paddingRight="6dp"
android:ellipsize="end"
/>
</LinearLayout>
</androidx.cardview.widget.CardView>
</LinearLayout>'Android > 간단한 뉴스 앱 만들기(기초)' 카테고리의 다른 글
| 간단한 뉴스 앱 만들기 #5 - 인터넷 브라우저로 열기 (0) | 2021.01.20 |
|---|---|
| 간단한 뉴스 앱 만들기 #4 - 화면 전환 (0) | 2021.01.20 |
| 간단한 뉴스 앱 만들기 #3 - newsapi로 데이터 받아오기 (0) | 2021.01.17 |
| 간단한 뉴스 앱 만들기 #2 - RecyclerView (0) | 2021.01.17 |


최근댓글